Monday, November 30, 2009

Refined Eyes


In this picture, I first realized that the picture is very light and it needed to be darker. As I made it darker using the dodge tool, I made the eye look better by using the same method that I used to make a older person look younger, which is the healing tool.

Light in the Shadows


In this photo, there was a mistake that was taken. The mistake in the picture was that the person was not seen at all. I used Image adjustments brightness contrast and I made the picture seem visible.

chubby


In this picture, I basically did the same thing to make a fat person skinny, only this time I stretched the person out. I went on filter liquify and I used the forward wrap tool and this was my result. I didn't want the person to look really fat, I just wanted her to look like she gained few pounds.

anorexic


My goal in this picture was to make the person skinner. I used Filter liquify and used the forward wrap tool to push in the stomach and hip of the person. then I used the pucker tool to push in the chest area of the person so it can look balanced to the rest of the body. After repeating the same steps to the picture until I reached my results, I applied a background to the picture.

Wednesday, November 25, 2009

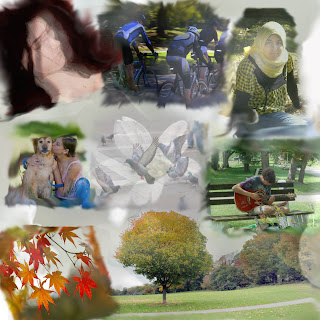
Natures Collage

In this collage, I basically collected all the photo's that I took in Prospect Park and put them together in one picture as you can see. I then smoothed out the edges of each picture so that it wouldn't look too "pointy". I applied the transparency  effect to the middle picture and the background so that way, it can give it a more darker lighting. Finally I organized the collage and this was my result. 

Tuesday, November 10, 2009

Rooney in the Spotlight


In this picture, I cut out the person. On top of the picture, i placed a spotlight, and made it transparency so the person can be shown. to make the spot light seem more nicer, i used the smooth tool to make the straight lines of the edges look more like smooth zigzag line. After that, I selected the person and traced it over with the burn tool to make him look like he was under a spotlight.

Animal Project Part III


This is part three from my animal project. Once again I copied and pasted the original picture, and used the lighting effects to make the animal pop out and make it look like the photo was taken from up front.

Animal Project Part II


This is part two of my animal project. I basically did everything i did before, in fact I copied and pasted. Only this time, I made the picture look like it was taken from the side, still using the lighting effects.

Animal Project Part I


In this illustration, I first cut the face of the wolf and I cut the body of the cat and used the smooth tool to combine the two animals together. (I smoothed the neck to the upper part of the body). Then I set a bedroom background and placed the animal on the floor. After that, I placed a mother with her child sleeping, as if it was a natural or everyday scene. last but not least I clicked filter< render, lighting effects and I made the background lighter than the animal so that it looks like i took the picture from the back.

Ronaldo: In My Memory


This picture was created using Image< adjustments, and a few of the many lighting levels such as auto level, color balance and the brightness of the picture. I took the portrait of the athlete and set a soccer stage background since he is a soccer player, and did transparence to another picture of the person showing an exciting mood. I also used the Gaussian blur to blur the transparency picture so that it will look more like a "memory". Also i used the smooth tool to smooth out the transparency picture so the edges wont be showing.